Green screen technology has revolutionized the film and video production industry, allowing filmmakers to create stunning visual effects and imaginary worlds. But, as with any technology, there’s a learning curve. Without proper knowledge and execution, green screen usage can lead to faulty output and unprofessional results. This article will delve into the common mistakes made while using green screen technology and offer expert advice on how to avoid and correct them. We will start with a basic understanding of what a green screen is, move onto common pitfalls and tips to avoid them, and finally, illustrate our points with real-life case studies. Whether you’re a seasoned filmmaker or a beginner experimenting with green screen, this article will provide you with valuable insights to hone your skills.
1. “Understanding the Basics: What is a Green Screen?”
A green screen, also known as chroma key, is a technique used predominantly in video production and photography to separate the subject from the background and superimpose it onto a different backdrop. This technique is widely used in filmmaking, news broadcasting, video gaming, and even in personal content creation for online platforms. It essentially involves filming a subject against a green background and later replacing that green background with a different image during the post-production process.
The basic concept behind the green screen technique is the use of color contrast and uniformity. The color green is used because it is the furthest away from human skin tones, reducing the chances of any part of the subject being accidentally ‘keyed out’. It also is less matched in clothing, which makes it easier to avoid issues of transparency or color spill.
However, using a green screen is not as simple as just setting up a green backdrop. There are many factors to consider, such as lighting, camera settings, and the color and material of the subject’s clothing. Understanding these basics is crucial to avoid common green screen mistakes.
2. “Common Pitfalls: Most Frequent Green Screen Mistakes”
Green screen technology has revolutionized the film and photography industry, enabling creators to superimpose any desired background behind subjects. However, its use is not without challenges, and common mistakes can hinder the quality of the final output. Here, we will discuss the most frequent green screen mistakes and how to avoid them.
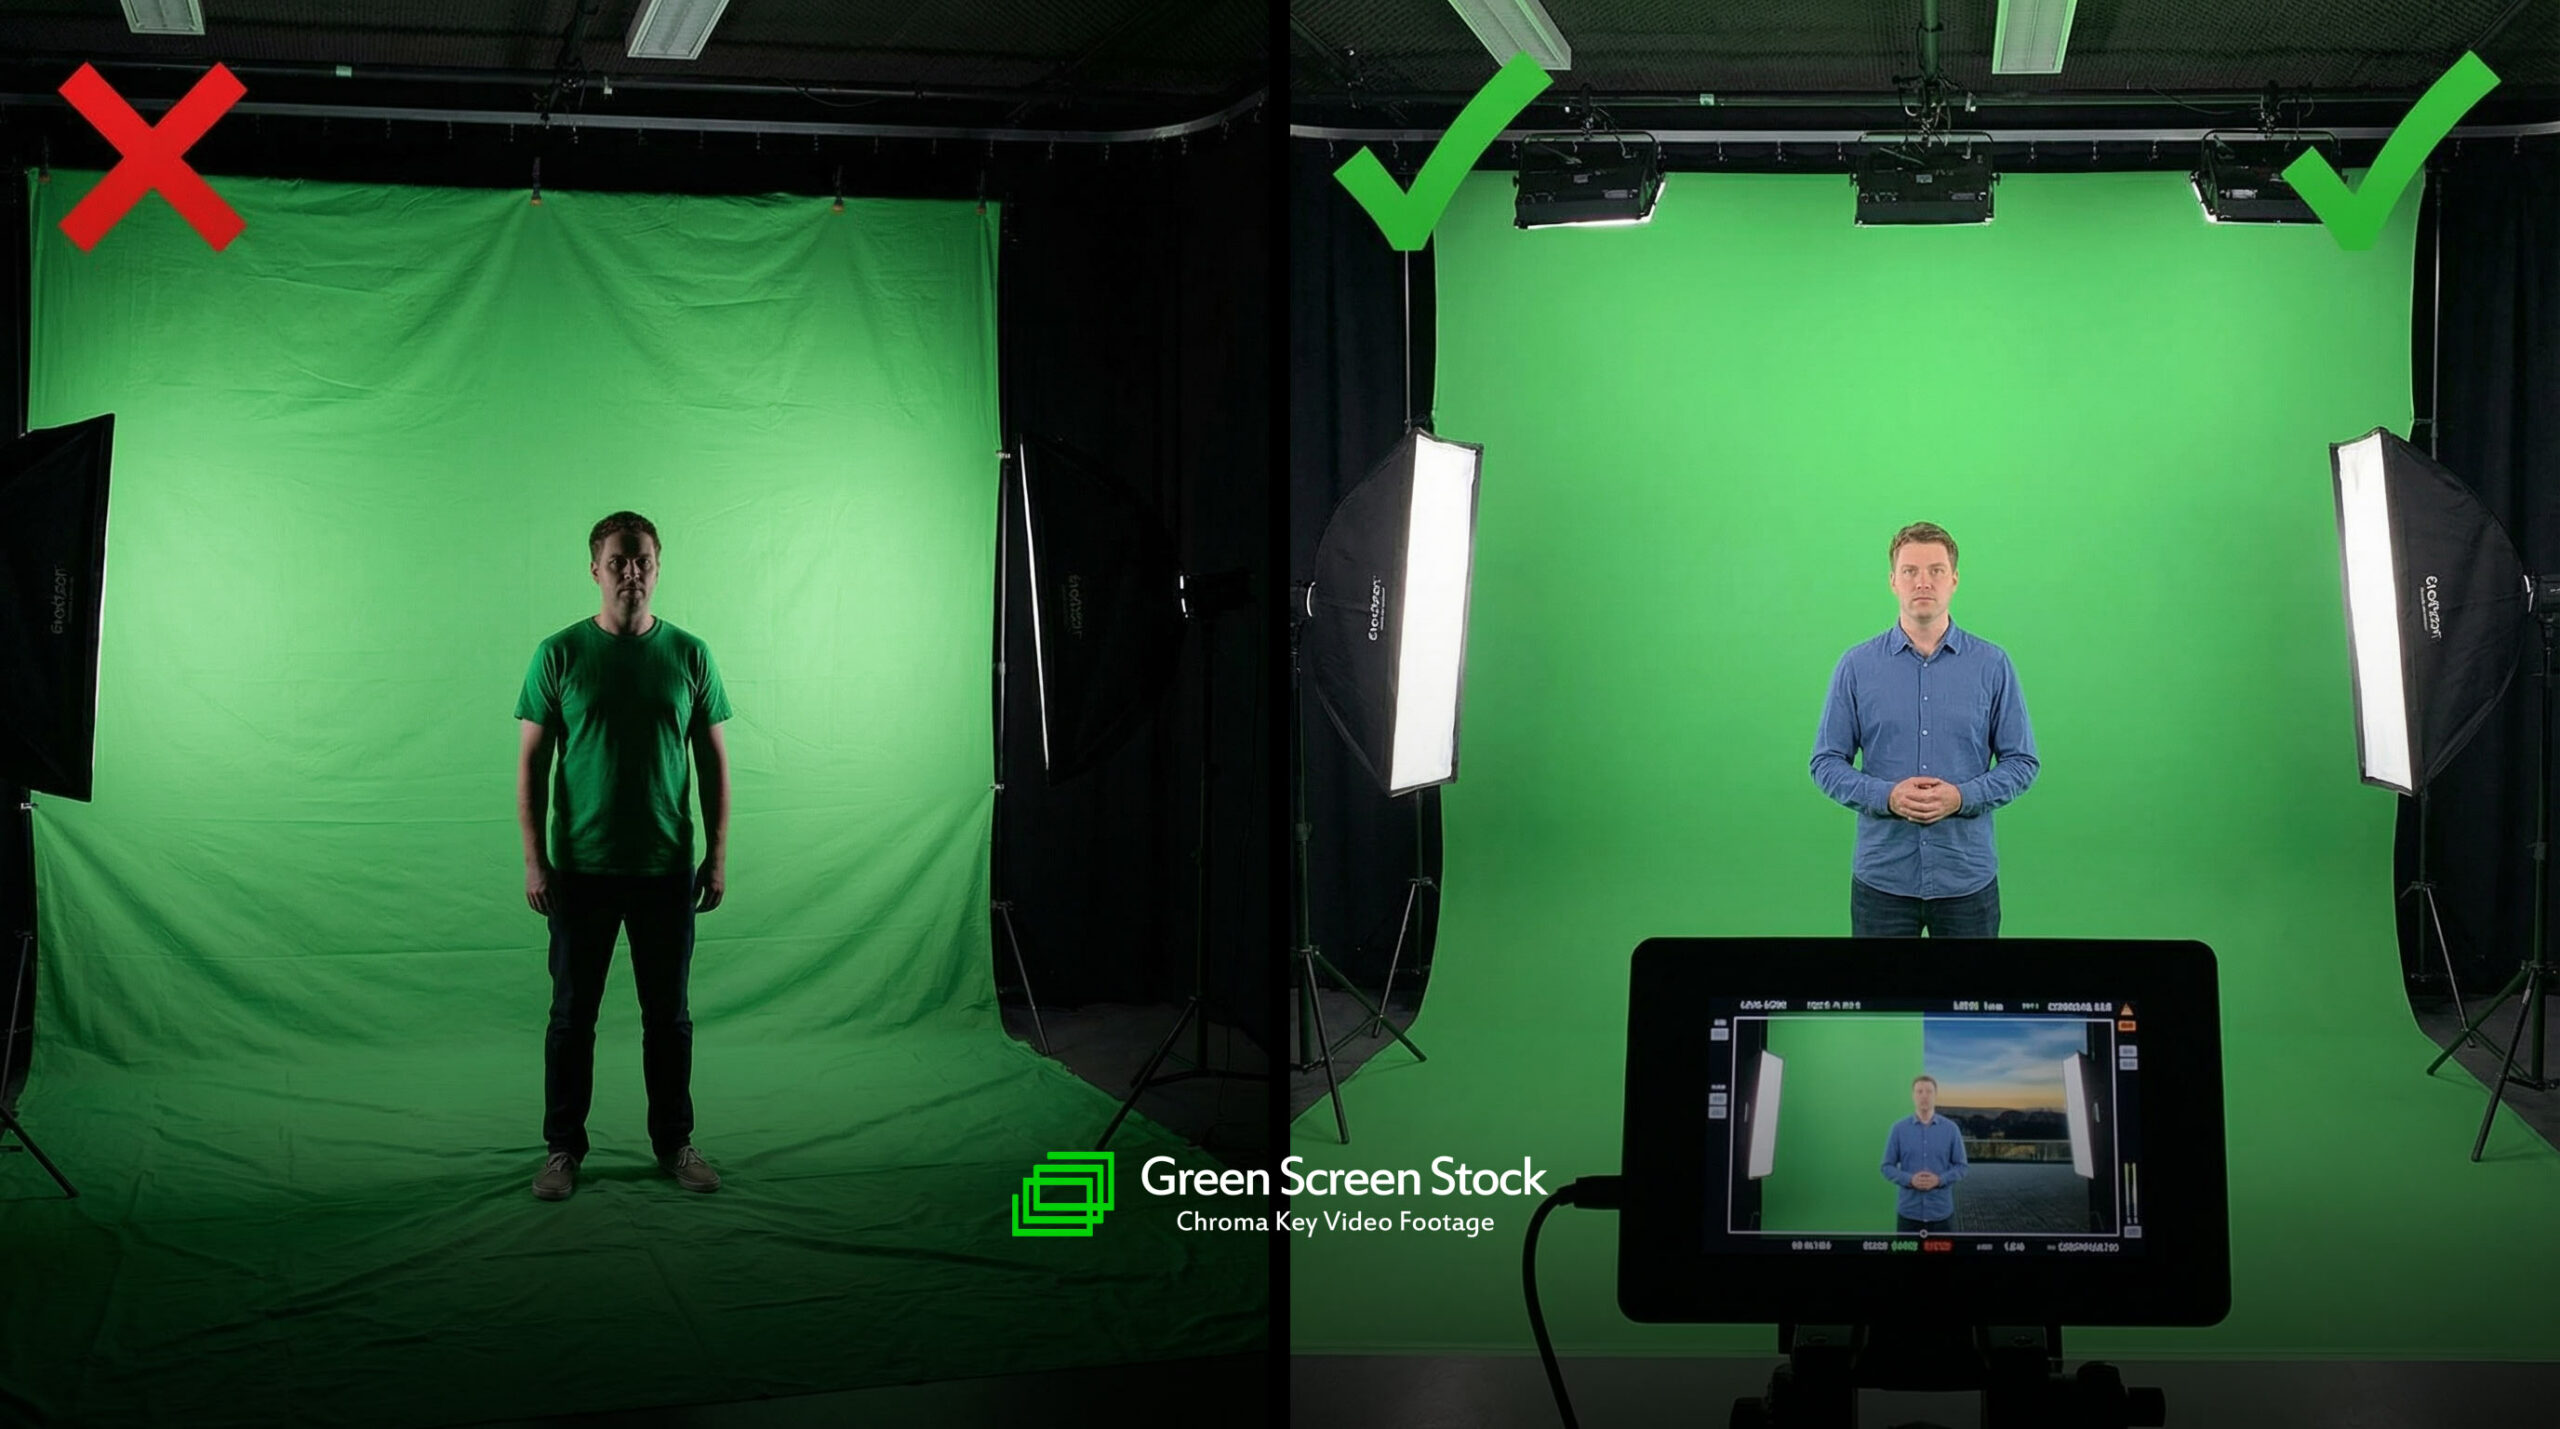
One of the most common mistakes is poor lighting. This issue often manifests in the form of uneven lighting, where some parts of the green screen are brighter than others. The consequence is a patchy and inconsistent chroma key effect, resulting in a less than ideal backdrop. The solution is to use multiple light sources positioned strategically to ensure even illumination of the green screen.
Another frequent error is choosing a subject or props that are similarly colored to the green screen. This can lead to parts of the subject being removed together with the background during the chroma keying process. To avoid this, make sure your subject and props contrast with the green screen.
Reflections and shadows are other common issues. These might interfere with the chroma keying process, leading to an unnatural look in the final image or video. To prevent reflections, be mindful of using shiny props or clothing. Shadows can be minimized by correctly positioning the lighting and the subject.
One more common mistake is not using a high-quality green screen. Wrinkles, spots, or different shades of green can all negatively impact the quality of your footage. Therefore, investing in a good quality, well-maintained green screen is crucial.
Lastly, many people do not leave enough distance between the subject and the green screen. This results in green spill, where the green color reflects onto the subject, particularly around the edges. This problem can be mitigated by increasing the distance between the subject and the green screen.
In summary, avoiding green screen mistakes requires careful planning, appropriate setup, and attention to detail. Proper lighting, contrasting props, avoidance of reflections and shadows, a high-quality green screen, and adequate spacing can ensure a clean, professional chroma key effect.
3. “Expert Tips: How to Avoid Green Screen Mistakes”
Green screen technology has revolutionized the world of film and photography by providing an effective and cost-efficient way to create various backgrounds and effects. However, when used incorrectly, it can produce less than desirable results. Here are some expert tips on how to avoid common green screen mistakes:
1. Lighting: One of the most common mistakes involves improper lighting, which can cause shadows, uneven backgrounds, and other disruptions. It’s essential to evenly light your green screen to prevent these issues. Use at least two light sources placed at opposite corners of the screen and avoid direct lighting on the subject to prevent casting shadows.
2. Wrinkles and Creases: Another common mistake is having wrinkles or creases on the green screen. These irregularities can cause problems during the editing process as they disrupt the uniform color of the screen. Always ensure that your green screen is smooth and wrinkle-free. You can use a steamer or a fabric conditioner to remove creases.
3. Color Spill: Color spill occurs when the green color from the screen reflects onto the subject, causing a green halo effect around them. To avoid this, maintain a fair distance between the subject and the screen. Also, use diffused lighting to minimize harsh reflections.
4. Clothing Color: Subjects should avoid wearing green or reflective clothing as they may blend into the green screen or reflect its color. This can complicate the editing process. If necessary, use a different color screen.
5. High-Quality Camera: A low-quality camera can result in a grainy and unprofessional output. Always use a high-quality camera that can capture a crisp and clear image.
6. Post-Production Editing: Last but not least, invest time in learning and mastering post-production editing software like Adobe After Effects or Final Cut Pro. This will help you effectively remove the green screen and create stunning visuals.
By keeping these tips in mind, you can avoid common green screen mistakes and create professional-grade visuals. Remember, practice makes perfect. The more you work with green screens, the better you’ll get at producing quality results.
4. “Case Studies: Real-Life Examples of Green Screen Errors and Corrections”
Case Studies: Real Life Examples of Green Screen Errors and Corrections
1. Hollywood Blockbuster: One of the most famous examples of green screen errors in recent years comes from a blockbuster Hollywood movie. In a particular scene, the lead actor was supposed to be standing in a desert, but due to a green screen mishap, viewers could see reflections of the green screen in his shiny sunglasses. In post-production, the reflections should have been replaced with the desert landscape. But the error was overlooked, creating a disconnect between the actor and the environment. To avoid such mistakes, it is crucial to pay attention to reflective surfaces when using a green screen and ensure they are properly edited in post-production.
2. News Broadcasting: In a live news broadcast, a weather reporter’s dress perfectly matched the green screen, causing her body to blend into the weather map. The error was quickly corrected by placing a jacket over her dress. This example illustrates the importance of avoiding green (or any color matching the background screen) while shooting in front of a green screen.
3. Music Video: In a popular music video, a green screen was used to superimpose the singer onto a dynamic, animated background. However, a problem arose when the color of the singer’s hair clashed with the green screen, causing parts of his hair to disappear in the final video. To correct this, the editing team had to painstakingly re-edit the frames, a time-consuming process that could have been avoided by choosing a different hair color or using a blue screen instead.
4. Indie Film: In an independent film production, the crew used a green screen to create an expansive cityscape background. However, the lighting on the actors didn’t match the lighting in the background image, resulting in an unnatural look. The team had to reshoot the scenes with proper lighting to match the background. This case study highlights the importance of ensuring that the lighting on your subjects matches the lighting in your background to create a seamless, realistic effect.
These real-life case studies underline the importance of proper preparation, attention to detail, and post-production work when using green screens. By learning from these mistakes, one can significantly improve the quality of their green screen projects.
In conclusion, green screens are powerful tools in the world of video and photo editing, enabling creators to transport subjects to any setting imaginable. However, the effective use of green screens requires a solid understanding of their principles and potential pitfalls. Common mistakes like poor lighting, wrinkles or shadows on the screen, and inappropriate distance between the subject and the screen can result in unconvincing effects. Fortunately, by paying attention to expert tips and learning from real-life examples, these issues can be avoided or corrected. Ultimately, the key to mastering green screen technology lies in constant practice and learning from previous errors, ensuring each project is better than the last.